EOVSA Data Analysis Tutorial: Difference between revisions
| Line 148: | Line 148: | ||
EOVSA data is handled in [https://casa.nrao.edu CASA] tables system, known as a Measurement Set (MS). The actual visibility data are stored in a MAIN table that contains a number of rows, each of which is effectively a single timestamp for a single spectral window and a single baseline. Within SunCASA, you will have access to a collection of tools that allow you to explore and utilize the new radio dynamic spectroscopic imaging data from EOVSA. | EOVSA data is handled in [https://casa.nrao.edu CASA] tables system, known as a Measurement Set (MS). The actual visibility data are stored in a MAIN table that contains a number of rows, each of which is effectively a single timestamp for a single spectral window and a single baseline. Within SunCASA, you will have access to a collection of tools that allow you to explore and utilize the new radio dynamic spectroscopic imaging data from EOVSA. | ||
===[[Dynamic Spectrum and Imaging]]=== | |||
=Spectral Fitting with GSFIT= | =Spectral Fitting with GSFIT= | ||
Revision as of 19:05, 9 May 2019
Software
We have developed two packages for EOVSA data processing and analysis:
- SunCASA A wrapper around CASA for imaging and visualizing spectral imaging data of the Sun. More information about CASA can be found on NRAO's CASA website . Note, (Sun)CASA is ONLY AVAILABLE on UNIX-BASED PLATFORMS (sorry Windows users).
- GSFIT A IDL-widget(GUI)-based spectral fitting package called gsfit, which provides a user-friendly display of EOVSA image cubes and an interface to fast fitting codes (via platform-dependent shared-object libraries).
There are two approaches in accessing our software packages. One is through our Amazon AWS server (recommended for participants of the EOVSA tutorial at the RHESSI 18 Workshop). Another is to install them on your own machine. We discuss the first approach in Section 1.1, and the second in Section 1.2.1 (SunCASA) and 1.2.2 (GSFIT).
Connecting to AWS server
We use an Amazon AWS Lightsail server for testing purposes. The server has 2 CPUs, 8 GB RAM, and 160 GB SSD storage. It runs CentOS 7 (1901-01) Linux. Please limit your usage to LIGHTWEIGHT DATA PROCESSING ONLY.
NOTE: THE ACCOUNT IS ONLY INTENDED FOR THE EOVSA TUTORIAL, BUT *NOT* FOR CARRYING OUT ACTUAL DATA REDUCTION
- Obtain SSH Key from Bin Chen
- Put it under a secure location on your own machine.
- Follow remaining directions depending on your client machine.
Linux / Mac
Recommend to use "~/.ssh" (create if it does not exist by "mkdir ~/.ssh").
- Edit the permission of ~/.ssh and the key (here I use ~/.ssh as the directory to place your key)
chmod 700 ~/.ssh
chmod 400 ~/.ssh/guest-virgo.pem
- Log on to test AWS server (password-less)
ssh -X -i ~/.ssh/guest-virgo.pem guest@virgo.arcs.az.njit.edu
Windows (MobaXterm)
Recommend to use "Documents\MobaXterm\home\.ssh", which should exist if you have already installed the free MobaXterm[1].
- Create new session, click SSH, enter virgo.arcs.az.njit.edu for Remote host, guest for username.
- On advanced SSH settings tab, click Use private key, navigate to and select file guest_key.pem
- Close setup window and click the new sessions icon, which will log you in.
Once the connection is setup, you will have access to SunCASA and GSFIT (included in the sswIDL installation): Enter SunCASA
[guest@ip-172-26-5-203 ~]$ suncasa
Enter sswIDL
[guest@ip-172-26-5-203 ~]$ sswidl
SunCASA Installation on Your Own Machine
MacOS
We have packed a standard disk image (dmg) for installation on MacOS. It has been tested to work under Mojave (macOS v10.14). YMMV for earlier versions of macOS. Installation steps below:
- Download SunCASA disk image (SunCASA-0.7.4_Pre-release.OSX.dmg).
- If you do not have Java SE Development Kit (JDK) installed on your Mac, please download from the official site and install it before SunCASA installation. The latest version (JDK 12) was tested to work properly. Earlier versions may also work but YMMV.
- Open the disk image file (if your browser does not do so automatically).
- Drag the SunCASA application to the Applications folder of your hard disk.
- Eject the SunCASA disk image.
- Double-click the SunCASA application to run it for the first time. If the OS does not allow you to install apps from non-Apple sources, please Change the settings in "System Preferences-> Security & Privacy -> General" and "Allow applications downloaded from: Mac App store and identified developers". If the OS still reports that the app is damaged, please turn off the OS Gatekeeper for now by running command sudo spctl --master-disable in Terminal. Then double-click the SunCASA application again.
- Initialize SunCASA. To do so, run !install_suncasa from a SunCASA prompt. This step also allow you to create symbolic links to the SunCASA version and its executables (Administrator privileges are required), which will allow you to run suncasa, casaviewer, casaplotms, etc. from any terminal command line.
- Important: Make sure to turn the OS Gatekeeper back on after the installation by running sudo spctl --master-enable in Terminal.
- Optional: To update the data repository, run !update-data from the SunCASA prompt.
- Restart SunCASA by exiting the current SunCASA prompt, and run suncasa in Terminal or double-click the SunCASA application icon.
- Now SunCASA has been up and running on your Mac.
Linux
- To install SunCASA for Linux, we have packaged up a binary distribution of SunCASA which is available as a downloadable tar file. We have tested the package under Scientific Linux 6 (derived from RHEL 6) and CentOS 7 (equivalent to RHEL 7). They may work under some other Linux distributions (e.g. Ubuntu), but YMMV.
- The following prerequisite packages that need to be installed to be able to install SunCASA. Use command "yum install yourpackagename" in Terminal to install.
- xauth
- libXft
- libXi
- libXrandr
- libXfixes
- libXcursor
- libXinerama
- libGL
- libXpm
- Download the packages
- Untar the package
tar -xzvf SunCASA-release-##version##.tar.gz
You do not have to have root or sudo permission to install or run SunCASA. The package is self-contained in the (untarred) directory "SunCASA-release-##version##". You can move/delete the SunCASA directory as you wish. But to use the executables, do the following:
- All executables, including suncasa are in the SunCASA-release-##version##/bin directory. Include these executables to your path for once (examples below are in bash)
cd SunCASA-release-##version##/bin
PATH=`pwd`:$PATH
- Then you can initialize SunCASA with the command in bash
install_suncasa
- Optional: To update the data repository, run !update-data from the SunCASA prompt.
- Now SunCASA has been successfully installed on your machine. Open a new Terminal and run suncasa.
GSFIT Installation on Your Own Machine
We have developed a IDL-widget(GUI)-based spectral fitting package called gsfit, which provides a user-friendly display of EOVSA image cubes and an interface to fast fitting codes (via platform-dependent shared-object libraries). Fits to individual spectra can be done quickly for manual investigation, while parallel/multi-core batch processing of selected blocks of data can also be performed using a command prompt application called gsfitcp. A helper routine called gsfitview allows further display and investigation of the fitting results.
GSFIT Linux / Mac OS Requirements
On Mac and Unix platforms, the gfortran compiler must be also installed to allow automatic compilation of the source code located in the ..//gsfit/unix directory, in order to generate a series of shared libraries, when gsfit is launched for the first time. WARNING: For this action to be successfully completed, the user must have writing rights to the ..//gsfit/unix directory.
GSFIT Windows OS Requirements
The GSFIT package is distributed along with a set of dynamic link libraries located in the ..//gsfit/win subfolder, which have been compiled assuming a WIN64 architecture. For Win32, please contact us to inquire about alternative options.
GSFIT SSW_UPGRADE Instalation
The release version of the IDL GSFIT package is intended to be distributed through the SSW IDL repository [2]. Although installed as a stand-alone package, the GSFIT code relies on a series of IDL support routines that are part of the gx_simulator package. Therefore, in addition to installing the gsfit package , the gx_simulator package must be also installed. This installation can be performed by issuing an upgrade command, i.e.
IDL> ssw_upgrade,/gsfit,/gx_simulator,/gen,/spawn,/loud,/passive_ftp
GSFIT Manual SWW Installation and Setup
However, if as of today the GSFIT package has not been yet released through SSW, you may perform a manual install by copying the directory structure located at https://github.com/Gelu-Nita/GSFIT to your local machine SSW directory, $ssw/packages/gsfit/' If such manual installation is performed, the $ssw/gen/setup/setup.ssw_env script must be edited by adding or altering the following lines:
setenv SSW_GSFIT $SSW_PACKAGES/gsfit$

setenv SSW_PACKAGES_INSTR "packages/gsfit [...]"

setenv SSW_PACKAGES_ALL "$SSW_GSFIT [...]"
where [...] denote the definitions already existent in the original setup.ssw_env script.
GSFIT SSW Instrument Setup
Please note that, regardless the method chosen to install any of these two packages, to ensure proper functionality, one should make sure that sswidl.bat (on Windows platforms) or cshrc (on Unix or Mac platforms) scripts are properly updated such as to include gx_simulator and gsfit in the SSW_INSTR path declaration, i.e.
set SSW_INSTR=gx_simulator, gsfit [...]
where [..] denotes any other SSW packages already installed.
GSFIT Manual Stand-Alone Installation
Although not reccomended, one may in principle choose to install the gsfit and gx_simulator packages in standalone directories that are not part of the SSW repositories. However if this (not recommended) option is used, the gsfit and gx_simulator paths should be explicitly added to the IDL !path global variable, i.e.
and explicitly add this path to your IDL path structure.
IDL> !path='..//gsfit/idl:'+!path
IDL> !path='..//gx_simulator/idl:'+!path
where ../ should be replaced with the explicit paths to the respective local machine repositories.
Spectral Imaging with SunCASA
Before Starting SunCASA
You will likely be running SunCASA from a working directory that has your data on it, or where you want your output to go. It is easier to start from there than changing directory inside SunCASA. Warning: SunCASA does not like a directory that contains spaces in its path. If you have done the installation as instructed above, then there should be an executable script called suncasa in your system path. This script will set up the required environment and run the version of SunCASA that it points to.
You can open up a terminal, cd to your working directory and typing
suncasa
EOVSA data is handled in CASA tables system, known as a Measurement Set (MS). The actual visibility data are stored in a MAIN table that contains a number of rows, each of which is effectively a single timestamp for a single spectral window and a single baseline. Within SunCASA, you will have access to a collection of tools that allow you to explore and utilize the new radio dynamic spectroscopic imaging data from EOVSA.
Dynamic Spectrum and Imaging
Spectral Fitting with GSFIT
GSFIT GUI Application
The GSFIT GUI application may be launched as follows
IDL> gsfit [,nthreads]
where nthreads is an optional argument that indicates the number of parallel asynchronous threads to be used when performing the fit tasks. By default, GSFIT launches with only one thread, but the user may interactively add or delete threads as needed at the run-time up to the number of CPUs available on the system. After some delay while the interface loads, the GUI below should appear.
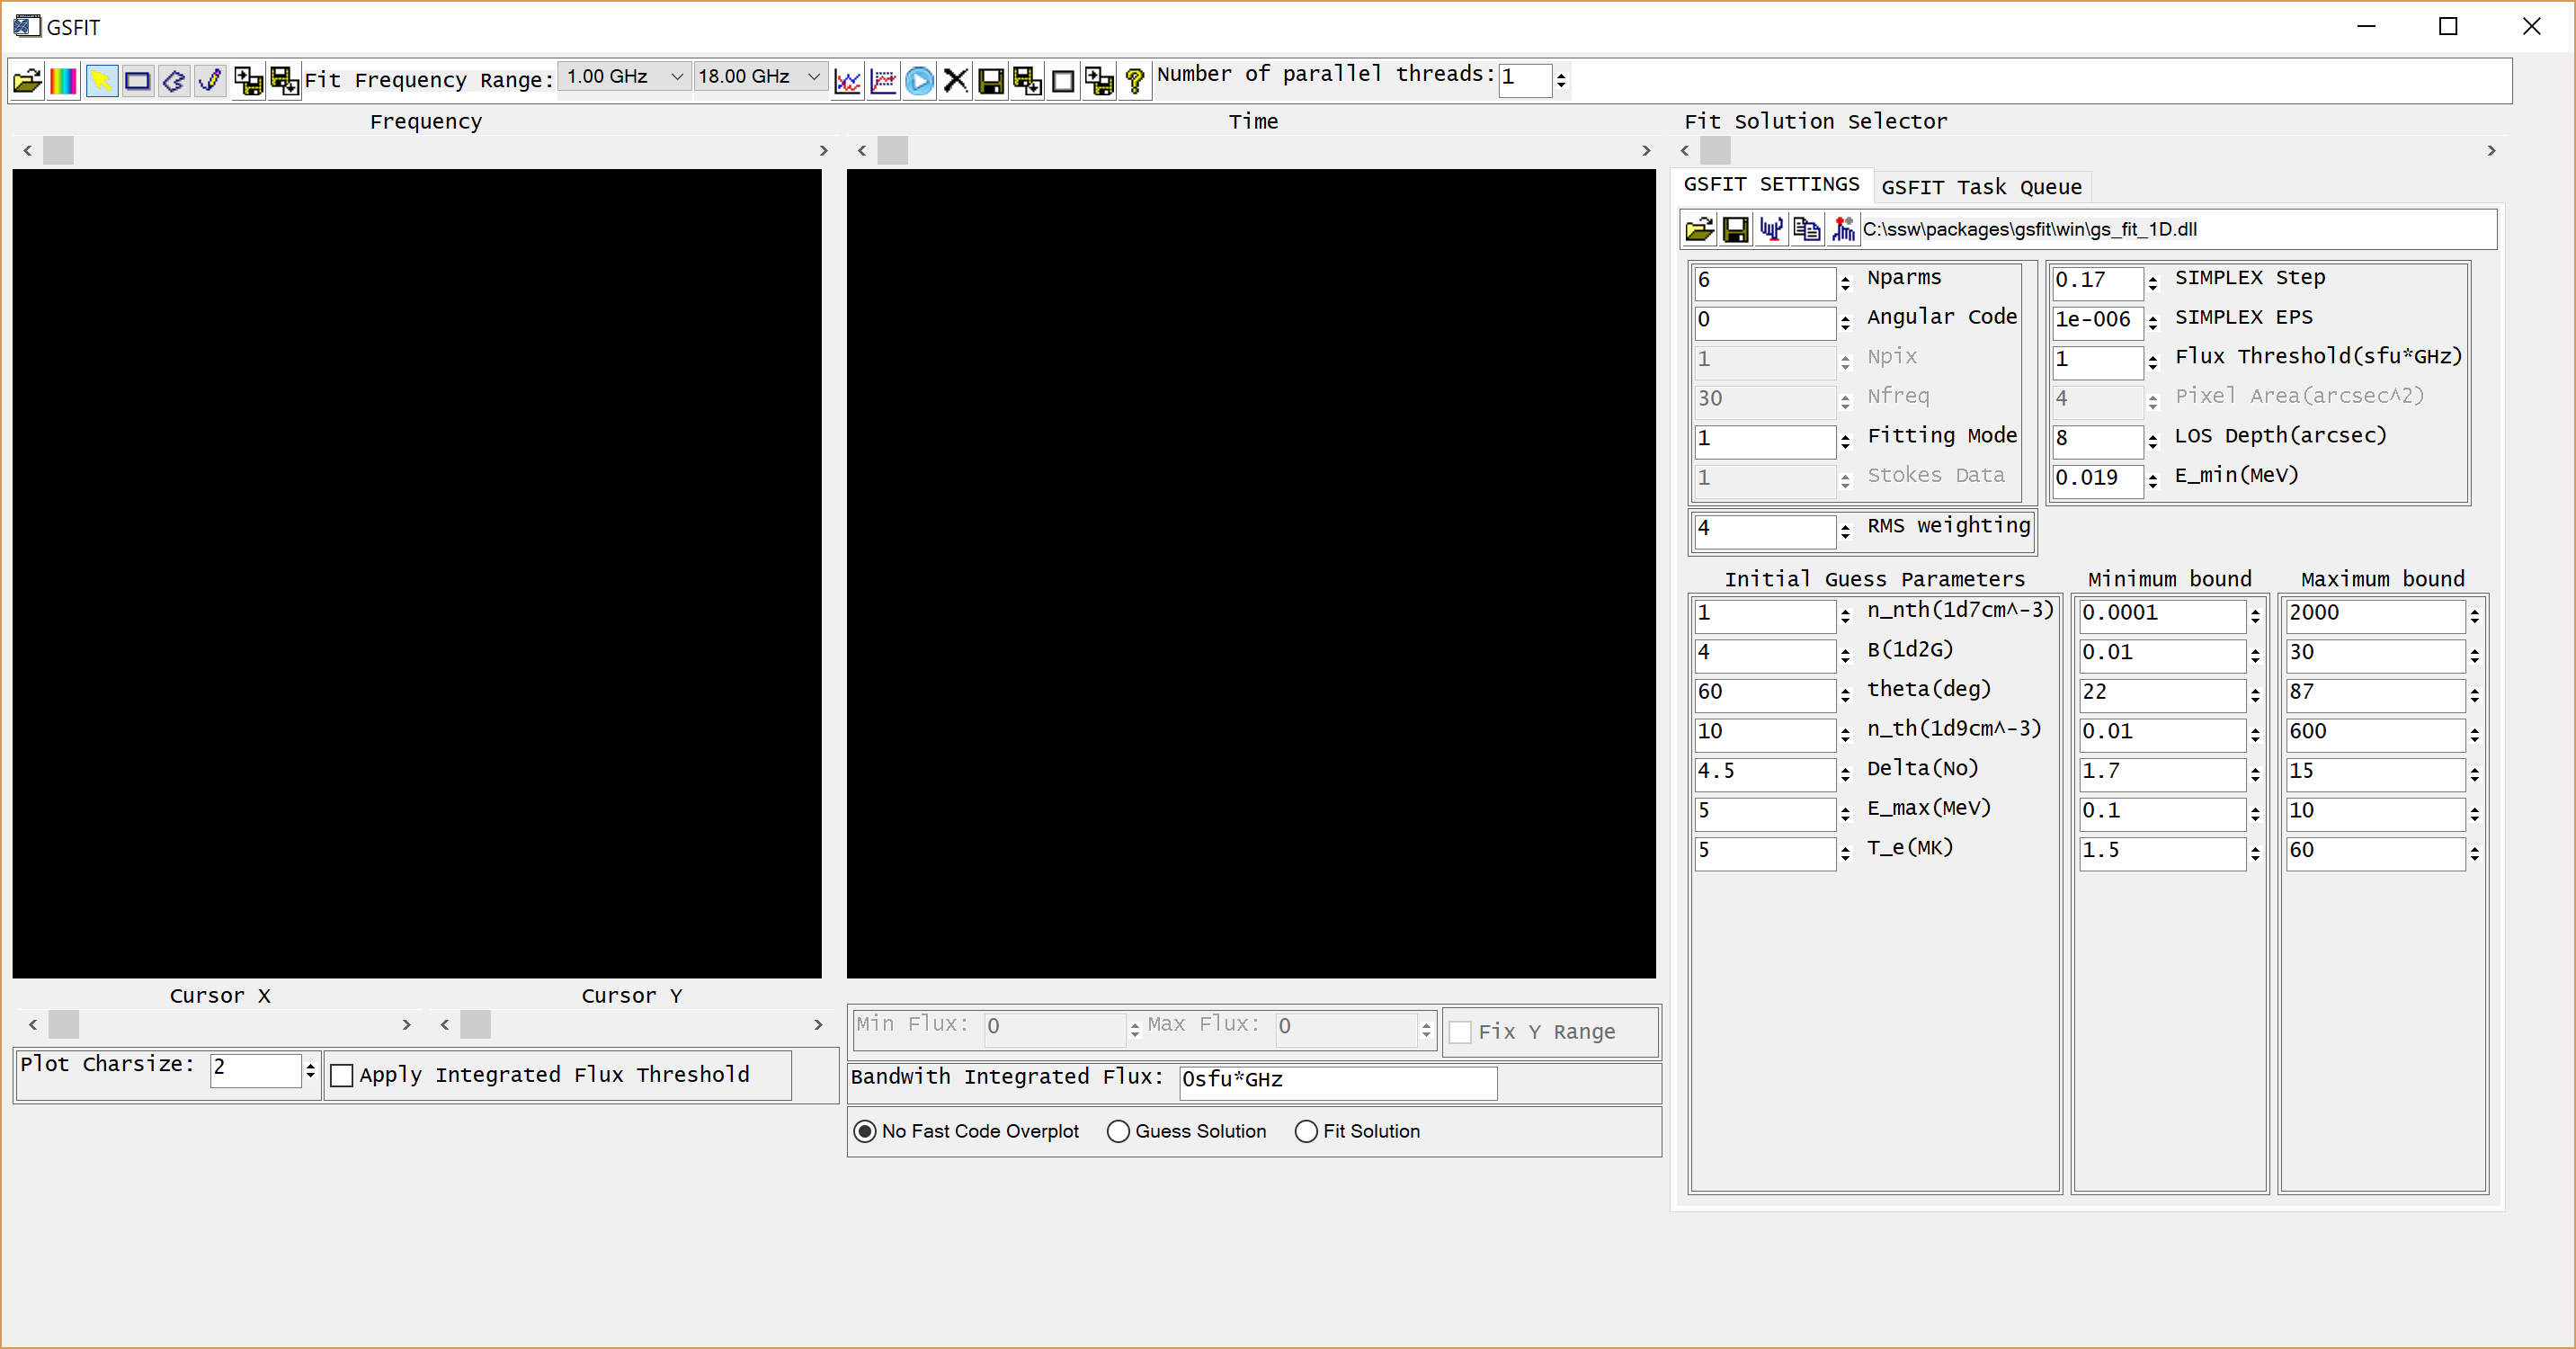
GSFIT GUI appearance on Windows OS
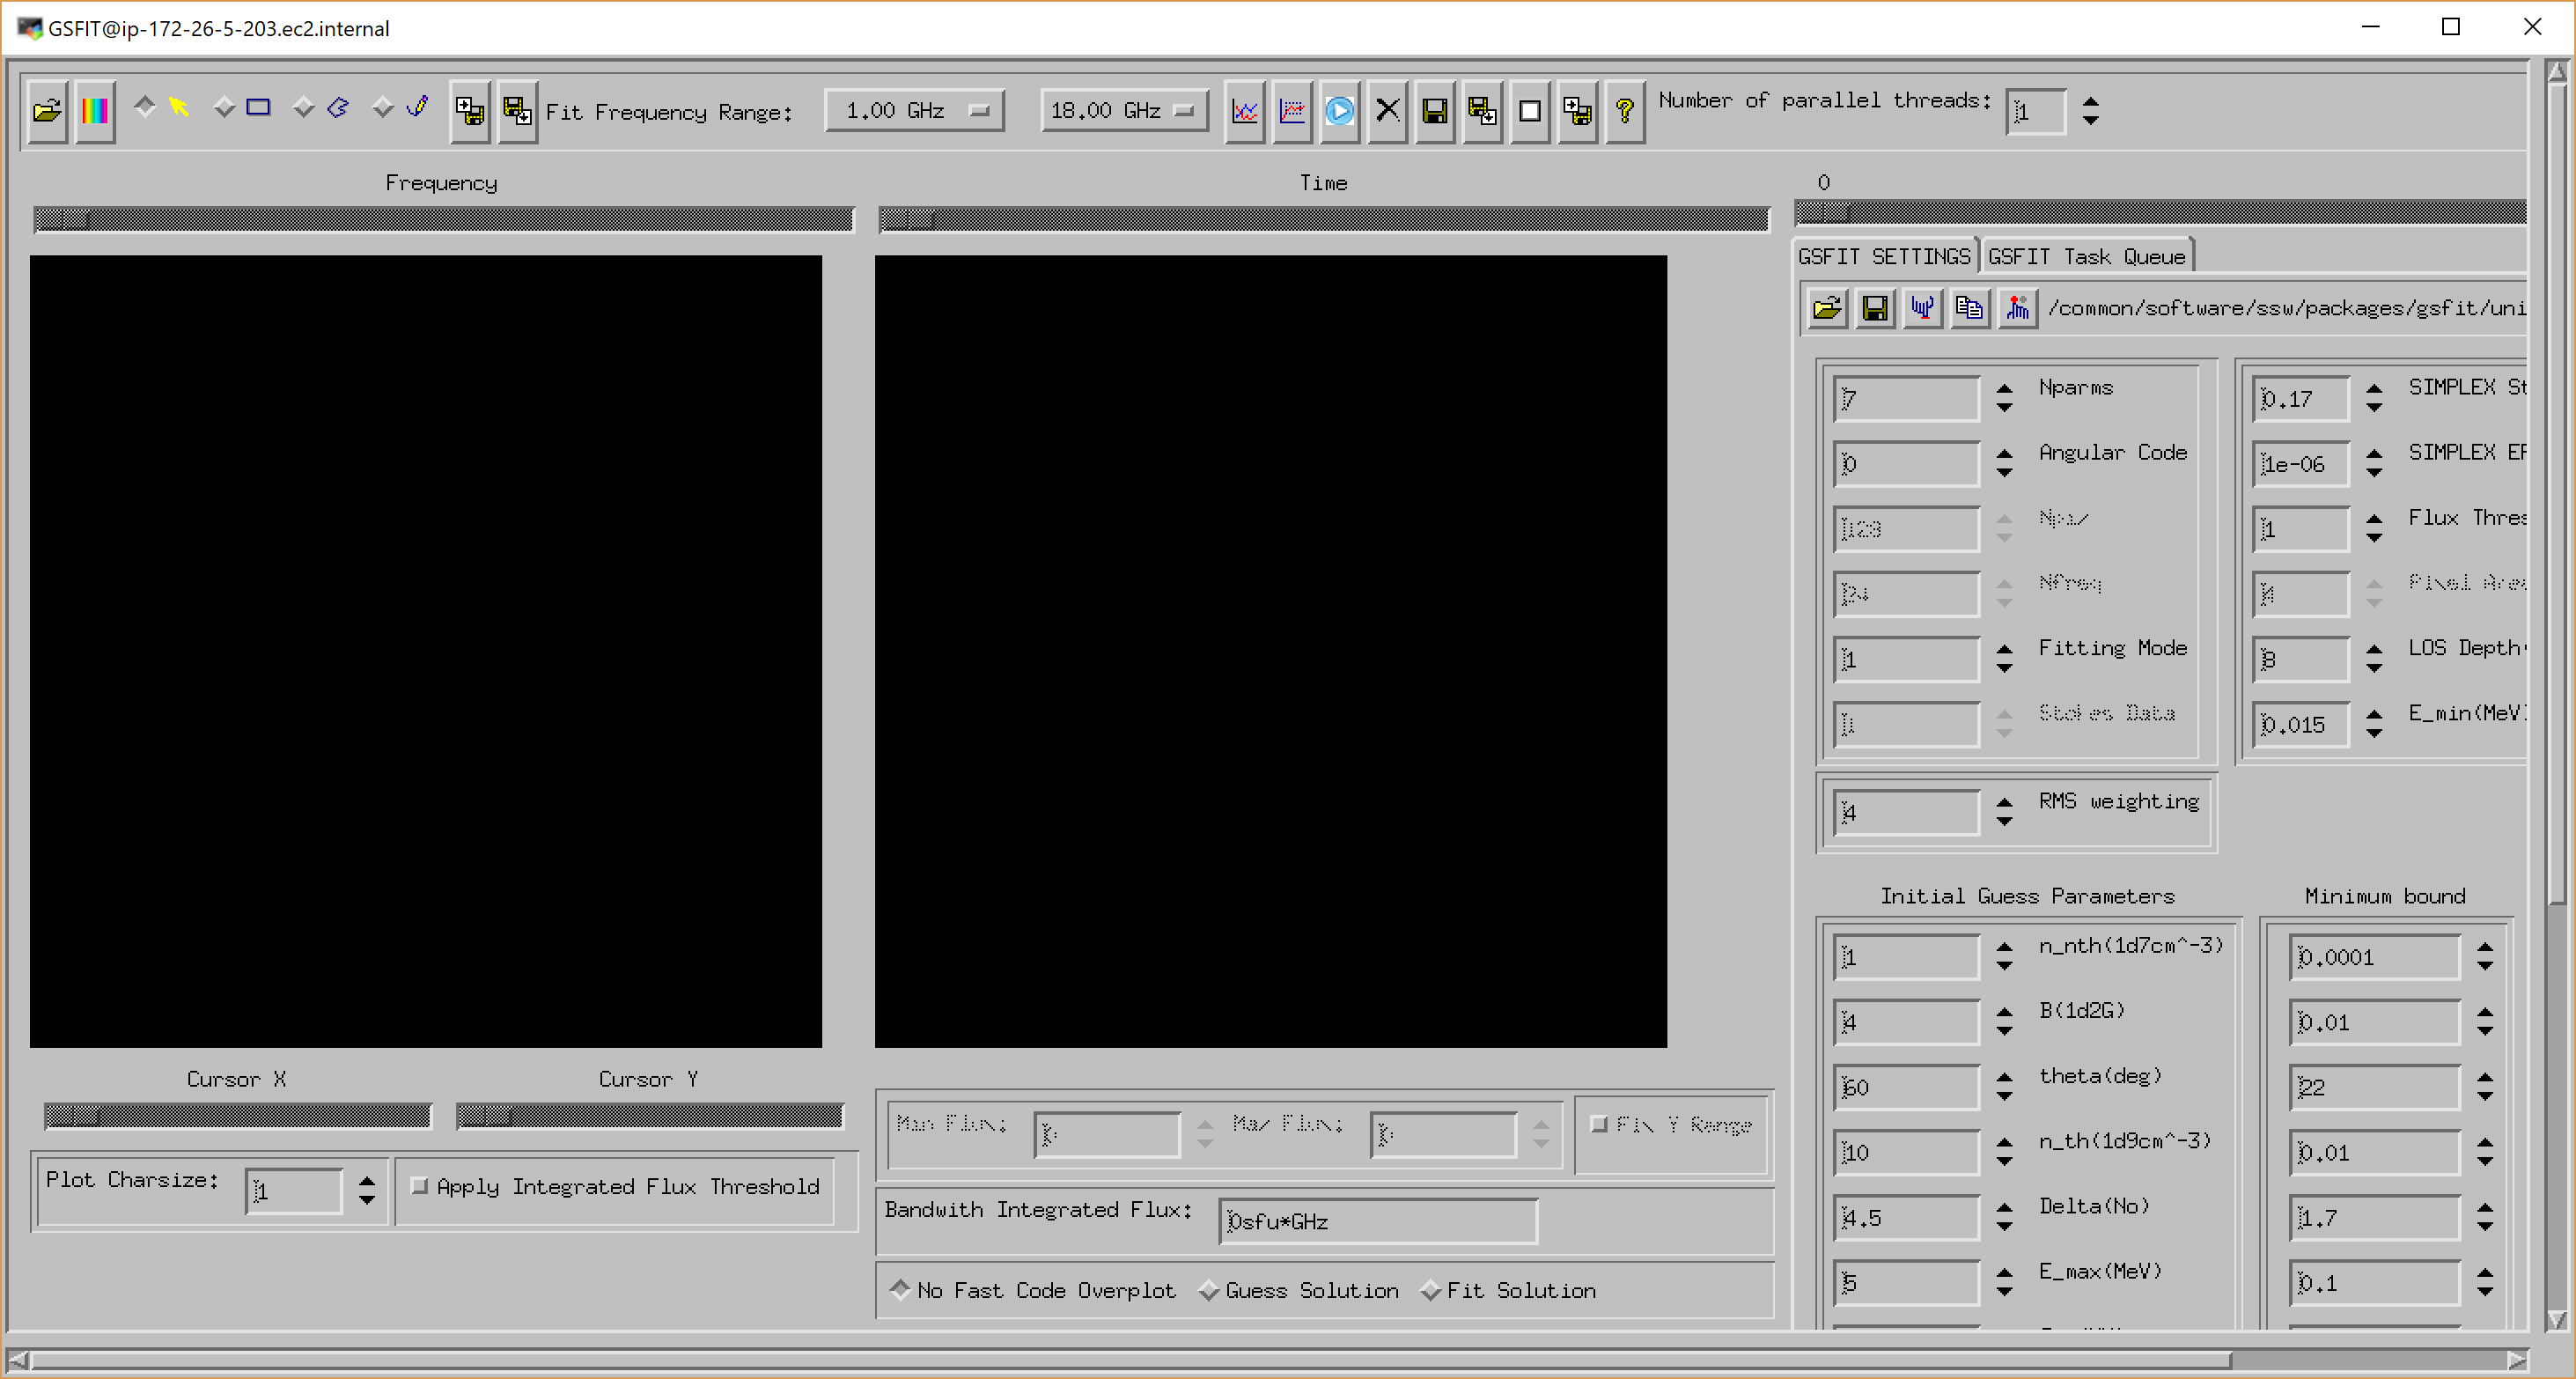
GSFIT GUI appearance on Linux/Mac OS


GSFIT GUI Organization and Functionality
GSFITVIEW GUI Application
The GSFITVIEW GUI application may be launched as follows
IDL> gsfitview [,gsfitmaps]
where the optional gsfitmaps argument is an IDL data and parameter map structure produced by the GSFIT or GSFITCP applications.

